
Purge Latency in Win11/10 with Easy Fixes
Purge Latency in Win11/10 with Easy Fixes
If you ever run into theWindows 11 or 10 slow Internet problem, don’t worry. It’s often quite easy to fix…
6 fixes for Windows 11/10 Slow Internet
All the fixes below work in Windows 11/10; just work your way down the list until the Internet slowdown problem is resolved.
- Disable Peer-to-Peer Update
- Adjust the Internet Bandwidth Settings
- Update your WiFi drivers
- Repair system files
- Disable Windows Auto-Tuning
- Disable Large Send Offload
- Some other modifications to try
Fix 1: Disable Peer to Peer Update
Peer to Peer Update is a feature in Windows that allows your computer to share Windows updates peer-to-peer with other computers over the Internet, which can compromise our Internet connection, hence the sluggish Internet issue.
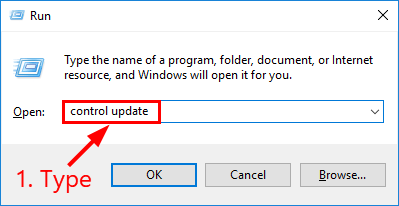
To disablePeer to Peer Update :
- On your keyboard, pressthe Windows logo key andR at the same time, then typecontrol update in the box and pressEnter .

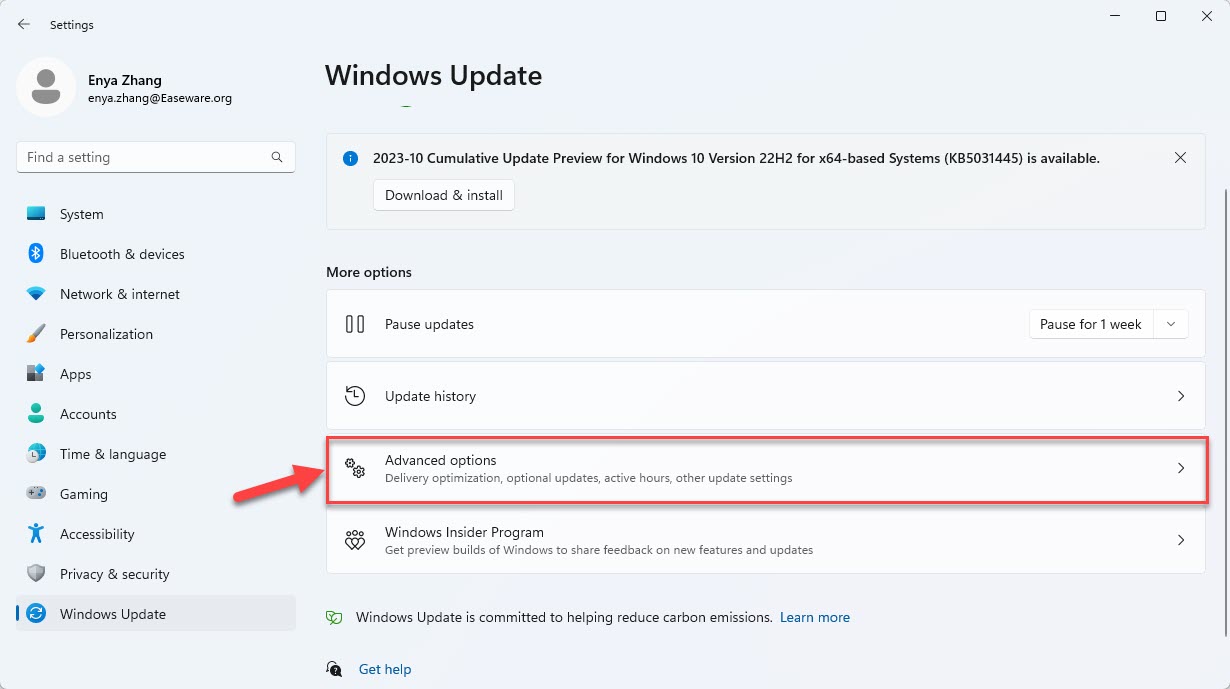
- ClickAdvanced options .
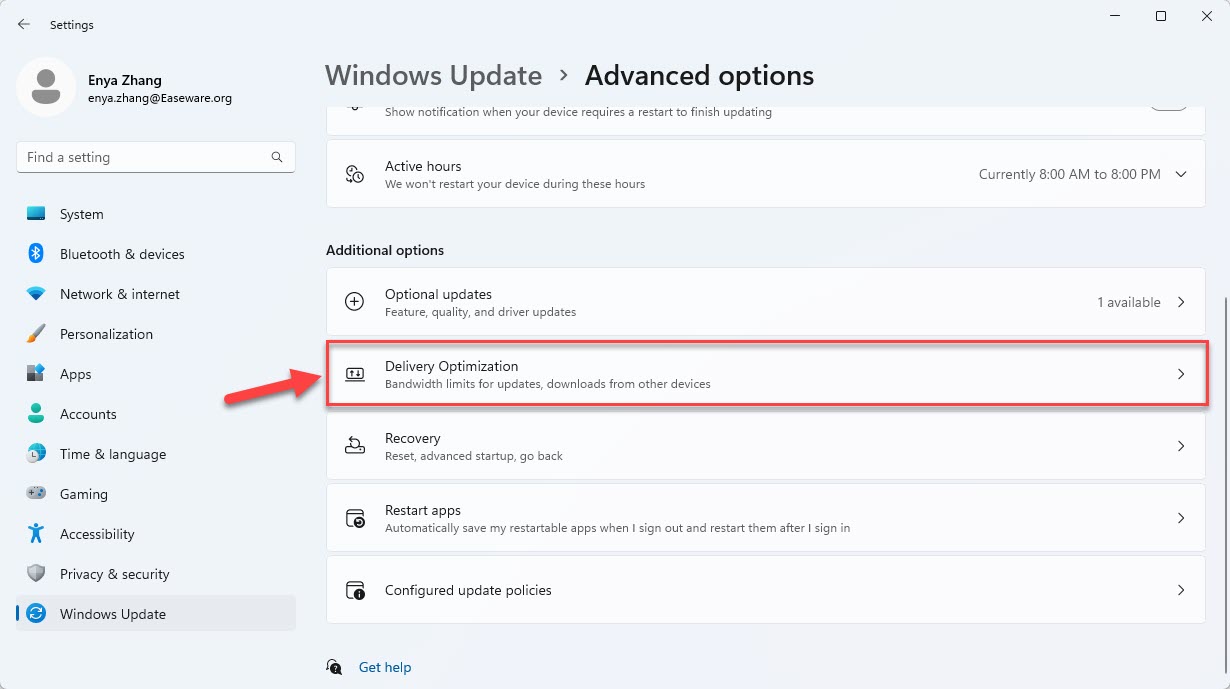
3. ClickDelivery Optimization (orChoose how updates are delivered depending on the build of your Windows 10).
4. Turn theAllow downloads from other PCs (OrUpdate from more than one place) toggleOff .
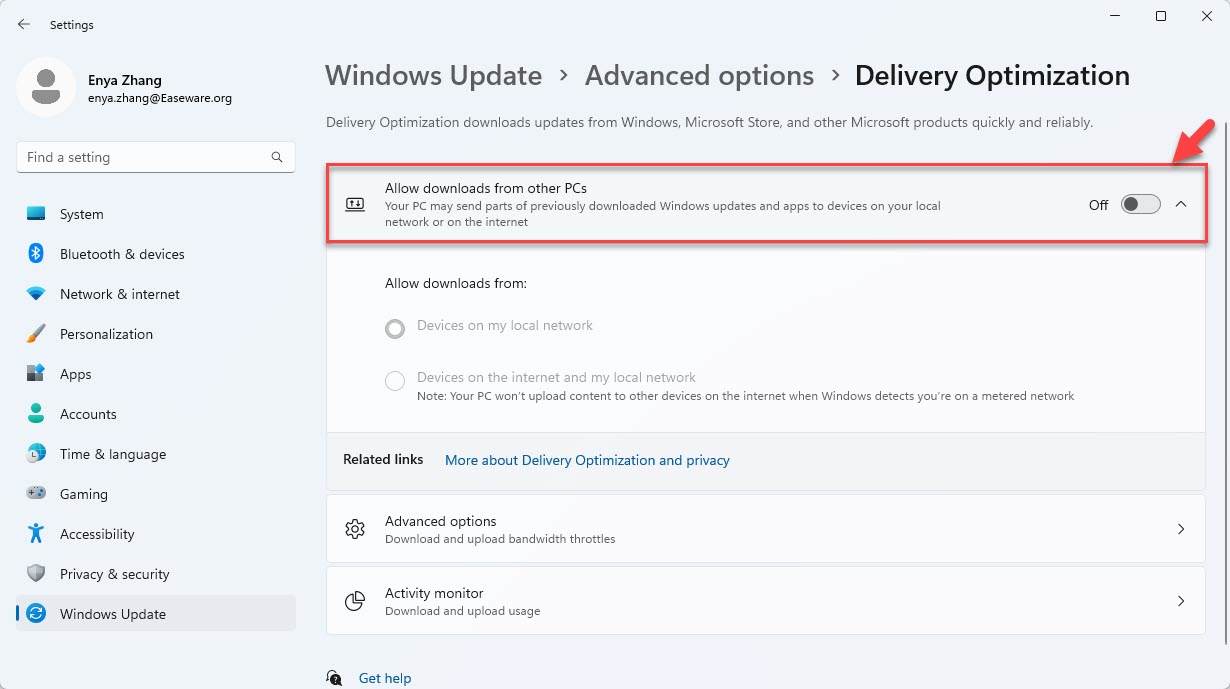
5. Check if theWindows 11/10 slow Internet issue has been fixed. If yes, then great! But if the problem persists, move on toFix 2 , below.
Fix 2: Adjust the Internet Bandwidth Settings
Please note that Group Policy Editor is not supported on Windows 10/11 Home Edition. So if you’re not using Windows Pro, or Enterprise, please move on to Fix3 .
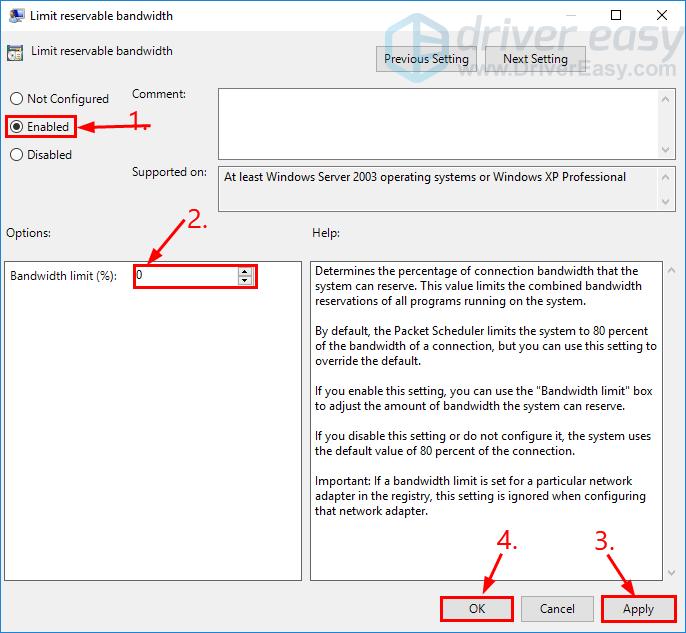
By default, Windows reserves 20% of your bandwidth for Windows Update, system apps, and other purposes, leaving you with 80% bandwidth of Internet connection. If you don’t use Windows Update on a daily basis and the reservation limit slows your Internet down, then you can remove the limit by setting the value to 0.
Here’s how to do it:
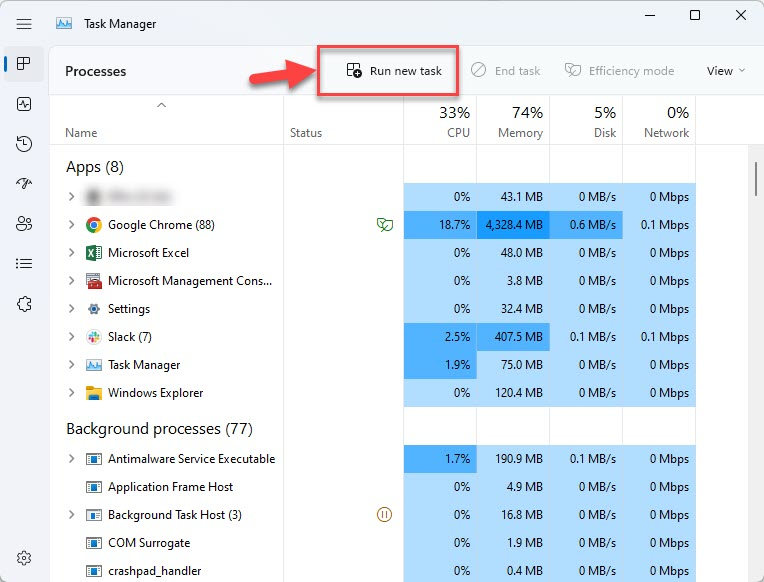
- On your keyboard, pressCtrl ,Shift, andEsc at the same time to open Task Manager.
- ClickRun new task .
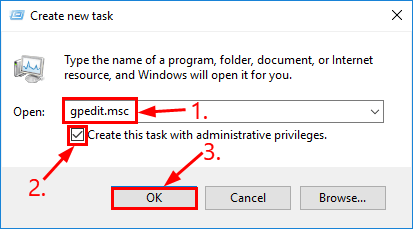
- Copy & paste gpedit.msc into the box, tick the box before Create this task with administrative privileges , and click OK .
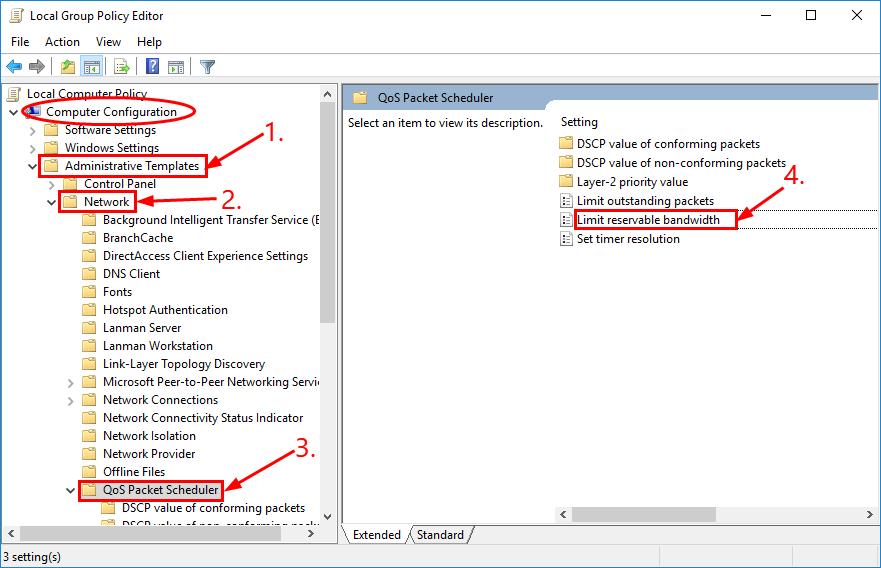
4. Under Computer Configuration , double-click onAdministrative Templates >Network >QoS Packet Scheduler . Then double-click on Limit reservable bandwidth .
5. Click theEnabled option and setBandwidth limit (%) value to0 . Then clickApply >OK .
6. Is your Internet getting any faster? If it’s still grinding to a crawl, you should tryFix 3 , below.
Fix 3: Update your WiFi drivers
This problem may occur if you are using the wrong/outdated WiFi drivers. So you should update your WiFi/network adapter driver drivers to see if it fixes your problem. If you don’t have the time, patience, or computer skills to update your drivers manually, you can do it automatically with Driver Easy .
Driver Easy will automatically recognize your system and find the correct drivers for it. You don’t need to know exactly what system your computer is running, you don’t need to risk downloading and installing the wrong driver, and you don’t need to worry about making a mistake when installing.Driver Easy handles it all.
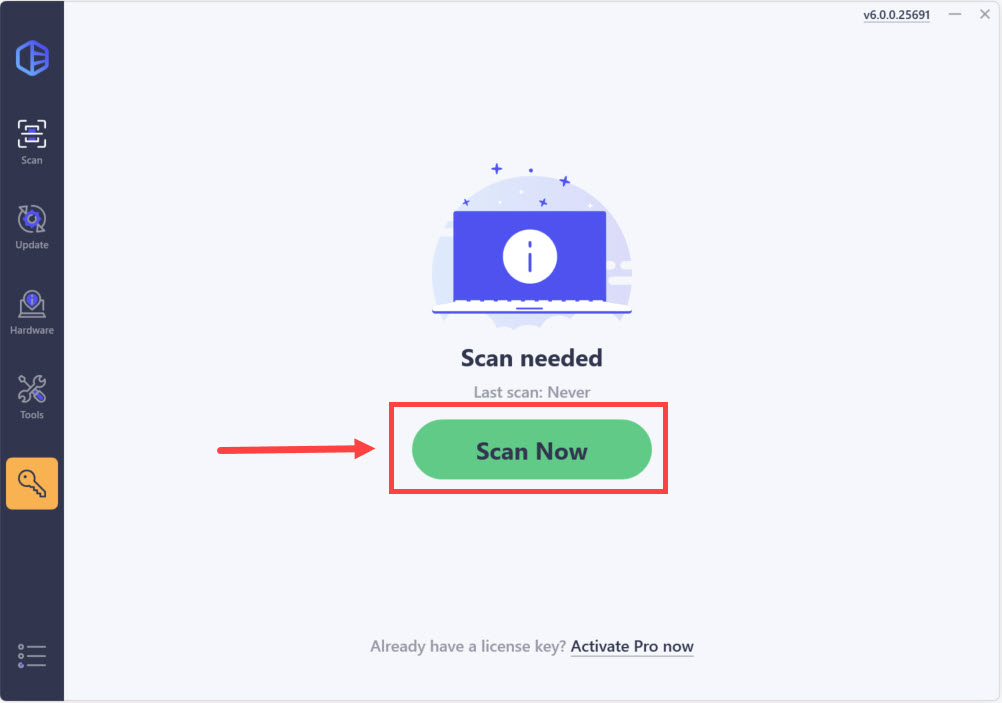
- Download andinstall Driver Easy.
- Run Driver Easy and click theScan Now button. Driver Easy will then scan your computer and detect any problem drivers.
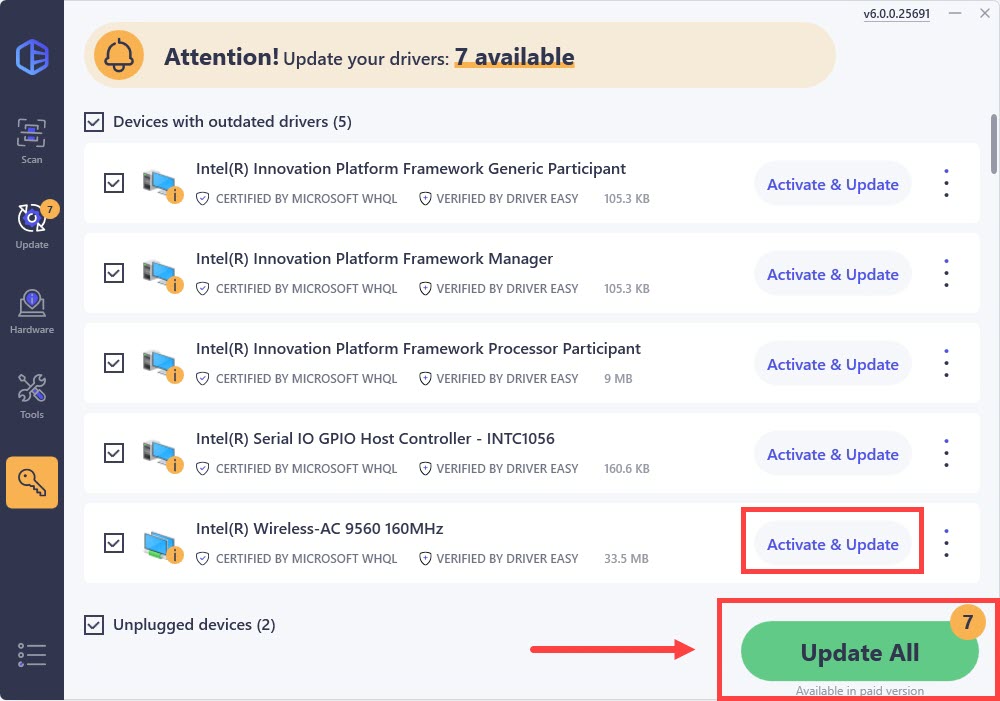
- ClickUpdate All to automatically download and install the correct version of all the drivers that are missing or out of date on your system. (This requires the Pro version which comes with full support and a 30-day money-back guarantee. You’ll be prompted to upgrade when you click Update All. If you’re not ready to buy the Pro version, Driver Easy offers a 7-day free trial which includes access to all the Pro features such as high-speed download and one-click install. You won’t be charged anything until your 7-day trial has ended.)
The Pro version of Driver Easy comes with full technical support . If you need assistance, please contact Driver Easy’s support team at [email protected] .
Restart your computer and see if the Windows 10 Slow Internet problem has been resolved. If yes, then congrats! If the issue still persists, please move on toFix 4 , below.
Fix 4: Repair system files
Missing, corrupt, or damaged system files may reduce your internet connection speeds. To eliminate this issue as a possible cause, you can try the 2 ways below to repair possible system file issues.
Repair & replace corrupt system files with Fortect
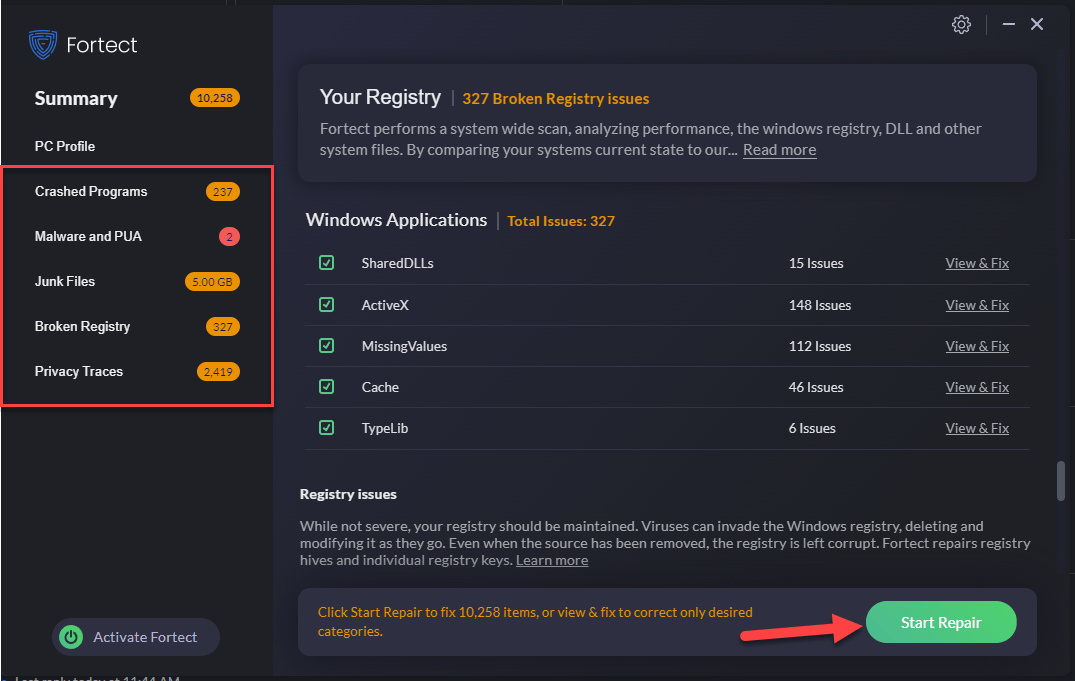
The slow internet in your Windows 10 computer could be caused by corrupt system files. Fortect is a tool that auto-detects slow internet and specializes in Windows repair.
With Fortect , the preliminary will scan your computer’s operating system for viruses, malware, and missing, damaged, or corrupt files, then it removes all problematic files found and replaces them with new healthy files. It’s like a clean reinstall of your operating system, except that you won’t lose any user data, and all programs, and settings are exactly as they are before the repair.
Here’s how to use Fortect to repair system files on your PC:
Download and install Fortect.
Open Fortect and Wait for Fortect to run a scan on your PC. The process might take a couple of minutes.
Once the scan finishes, you will get a summary of the issues found on your computer. If you need to proceed with the repair function, you’ll be required to purchase the full version.
Restart your computer for the changes to take effect.
Check your computer to see if the internet speed has returned to normal.
The full version of Fortect comes with a 60-day money-back guarantee and full customer support. If you run into any problems while using Fortect, or if it doesn’t work for you, don’t hesitate to contact Fortect Customer Support Team .
Run SFC scan
System File Checker (SFC) is a handy feature in Windows that helps scan your system files and repair missing or corrupted system files(including those related to BSOD). To run the SFC scan :
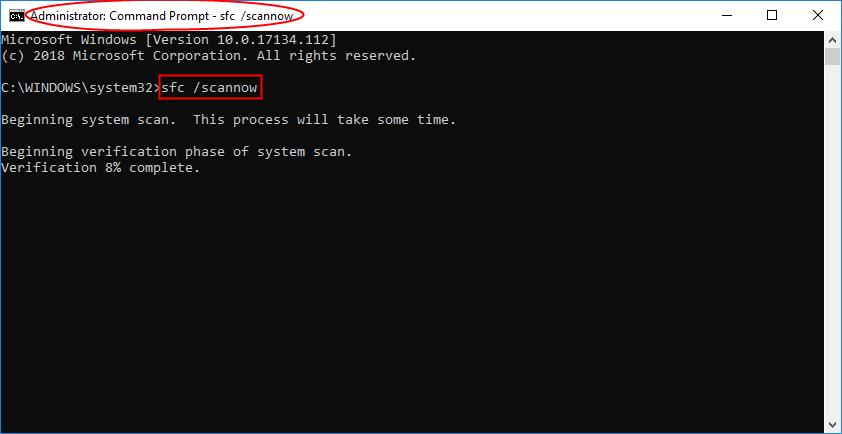
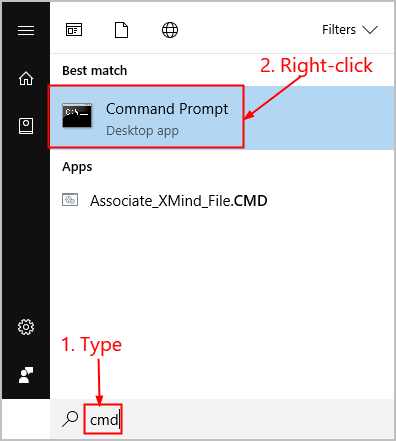
- On your keyboard, press theWindows logo key and type cmd . Then right-click on Command Prompt and click Run as administrator .
- ClickYes when prompted to confirm.

In the command prompt window, typesfc /scannow and press Enter .
It’ll take some time for the SFC to replace the corrupted system files with new ones if it detects any, so please be patient.Restart your computer for the changes to take effect.
Check your computer to see if theWindows 10 slow internet problem has been fixed. If yes, then congrats! If the issue still persists, please move on toFix 5 , below.
Fix 5: Disable Windows Auto-Tuning
Window Auto-Tuning is a feature in our Windows 10 to allow for more efficient data transfers. But it can also interfere with the network and cause loss of connectivity. So to disable the feature:
- On your keyboard, press the Windows logo key and type cmd . Then right click on Command Prompt and click Run as administrator .
Click Yes when prompted to confirm.
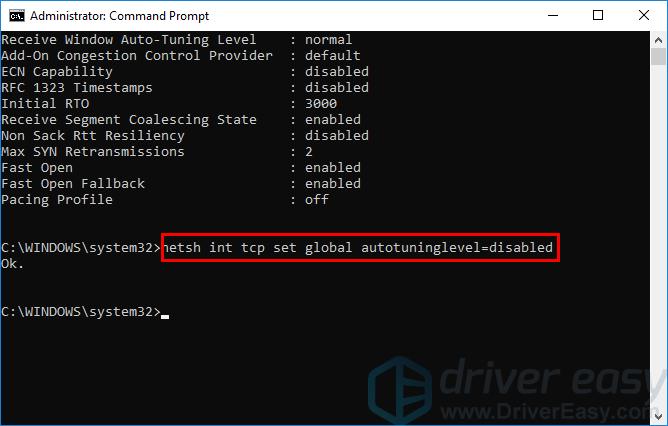
2. Copy & paste netsh interface tcp show global into the window and pressEnter . Then check ifReceive Window Auto-Tuning Level is set tonormal .
3. If yes, you’ll have to copy & pastenetsh int tcp set global autotuninglevel=disabled into the window and pressEnter to disable it.
4. Check to see if yourWindows 10 slow Internet problem has been solved. If the issue still lingers on, don’t worry, here’s one more fix to try.
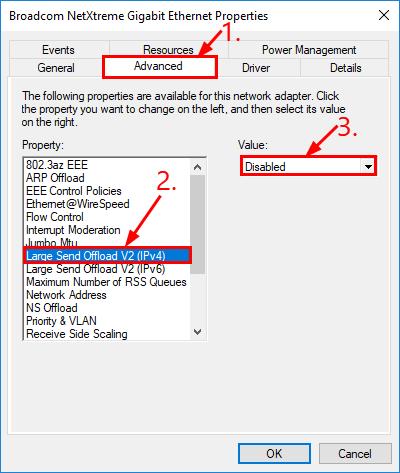
Fix 6: Disable Large Send Offload
Large Send Offload (LSO) is another feature in Windows designated for better network performance. Well-intended, but then the whole thing of allowing background apps to consume large amounts of network bandwidth is the reason why our Internet speed takes a hit. To disableLSO :
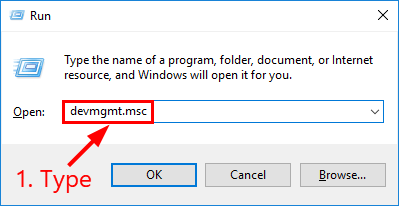
- On your keyboard, press the Windows logo key and R at the same time, then type devmgmt.msc into the box and pressEnter .
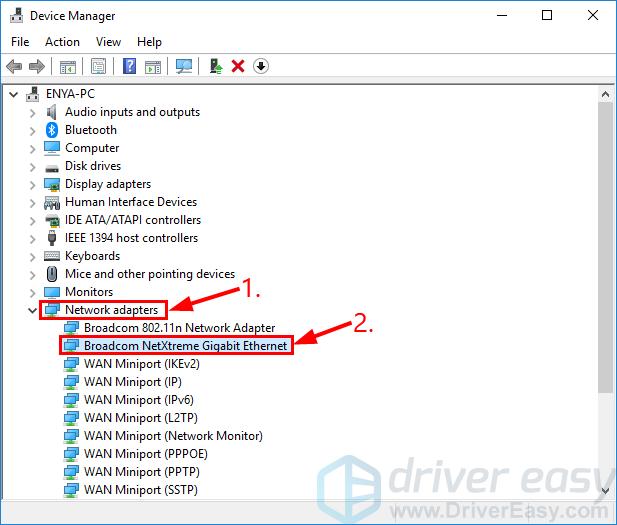
- Double-click onNetwork adapters >your network adapter .
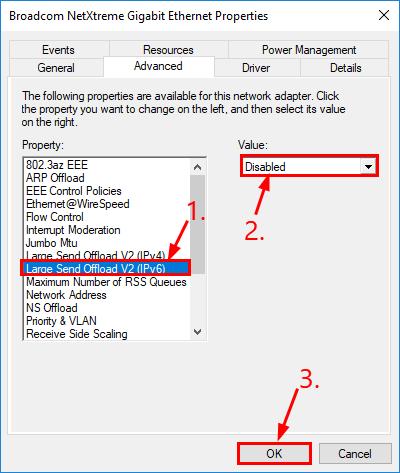
3. Click theAdvanced tab, then click Large Send Offload V2 (IPv4) and set thevalue toDisabled .
4. Click Large Send Offload V2 (IPv6) and set thevalue toDisabled . Then clickOK .
5. Hopefully, your Windows 10/11 Slow Internet issue has been resolved successfully.
Some other modifications
If none of the above network-related changes prove effective, here are some other tweaks that you can do to improve your network connectivity situation, and thus help to improve the network speed on your computer. Check the following to see if you’ve done them all:
- Reduce the number of devices connected to the same router to make sure that your main computer gets the most speed.
- Use a wired network connection (with an Ethernet cable) instead of Wi-Fi. If this is not an option, move your computer closer to the router.
- Update your router firmware if you haven’t already.
- In your router settings, try to enable QoS to prioritize gaming traffic . If you’re not sure where to find it, please visit your router’s official website to find the manual or seek help from your ISP.
- Contact your ISP . If you’ve tried everything and your internet is still slow, it might be an issue with your ISP (Internet Service Provider). Contact them for support.
- Upgrade Your Plan : If your internet plan is outdated or doesn’t provide enough bandwidth for your needs, consider upgrading to a plan with higher speeds.
- Upgrade your hardware . If the network settings are set up all correctly, but the network speed is still slow, it’s possible that your hardware is throttling the network speed. In that case, you may need to consider a more advanced router or modem, network cables and network adapters.
There you have it – 6 useful fixes for yourWindows 11/10 Slow Internet problem. Hope this helps and feel free to comment below if you have any further questions. 🙂
Also read:
- [New] In 2024, Creating Gradual Sound Diminishment
- [Updated] 2024 Approved Kinemaster Edition Creating Polished Transitions in Filmmaking
- 2024 Approved The Complete Guide to Adding Powerful Narrations
- 9 Solutions to Fix Process System Isnt Responding Error on OnePlus 12R | Dr.fone
- Access the Latest Insignia USB-to-Ethernet Driver - Free Download Options Available
- Balance Screen's Horizontal Boundaries
- BDR Optimization Across Windows Versions 10/8/7
- Bright Windows, Clean Views Ahead
- Bringing Back Screen Color: Fall Update Fix
- Graphic Hardware Not Suitable for Current Overwatch Version
- Qualcomm QCA61x4 Windows 10 Integration Success
- Revolutionizing Display Quality: Refreshed Intel Drivers in Windows 7 Systems
- Simplify Audio Hardware Maintenance Now
- The Consumer's Checklist: How to Acquire the Right TV for Your Residence
- Ultimate Guide: Capturing Screenshots on Your HP Computer
- Title: Purge Latency in Win11/10 with Easy Fixes
- Author: Paul
- Created at : 2025-02-18 16:06:24
- Updated at : 2025-02-19 21:58:21
- Link: https://network-issues.techidaily.com/purge-latency-in-win1110-with-easy-fixes/
- License: This work is licensed under CC BY-NC-SA 4.0.